
Spring Cloud Gateway using Kubernetes Service Discovery
Before going through the actual content of the blog, you should be aware of few of the concepts, such as
- What is Service Discovery? What is API Gateway and why we need it?
Please follow this POST to understand more about service discovery and API gateway.
Advantages of API Gateway
- There is single entry point for you application to external world. So, client doesn't need to know your application is split in micro-services.
- Authentication and Authorization can be simply applied to API Gateway.
- Security patches can be simply applied to API gateway. It does not mean that we should not secure our other services.
- Different application can focus on their business code, without worrying about how client will access their applications.
Disadvantages of API Gateway
- Increased complexity, as we now have additional layer in micro-service architecture.
- increased delay in response time, as each request need to pass through gateway.
Spring Cloud Gateway
Spring Cloud Gateway is an implementation of API Gateway, which can be used to expose services written in any language as single endpoint. It's written on top of the famous Spring framework. Some of the features of gateway are
- Dynamic Service Discovery using Consul, netflix eureka and kubernetes etcd.
- ability to match route request using any attribute such as method type, headers and etc.
- ability to write custom path and filters(logging, authorization and etc.)
- Load balancing and circuit breaker pattern support
- compatible with all Spring projects, which opens a lot of possibility
- support of spring reactive
Let's see how we can leverage spring cloud gateway in kubernetes for routing the request. We won't go in detail about what is Kubernetes and it's components in this post. Let's see how we can use API gateway from scratch.
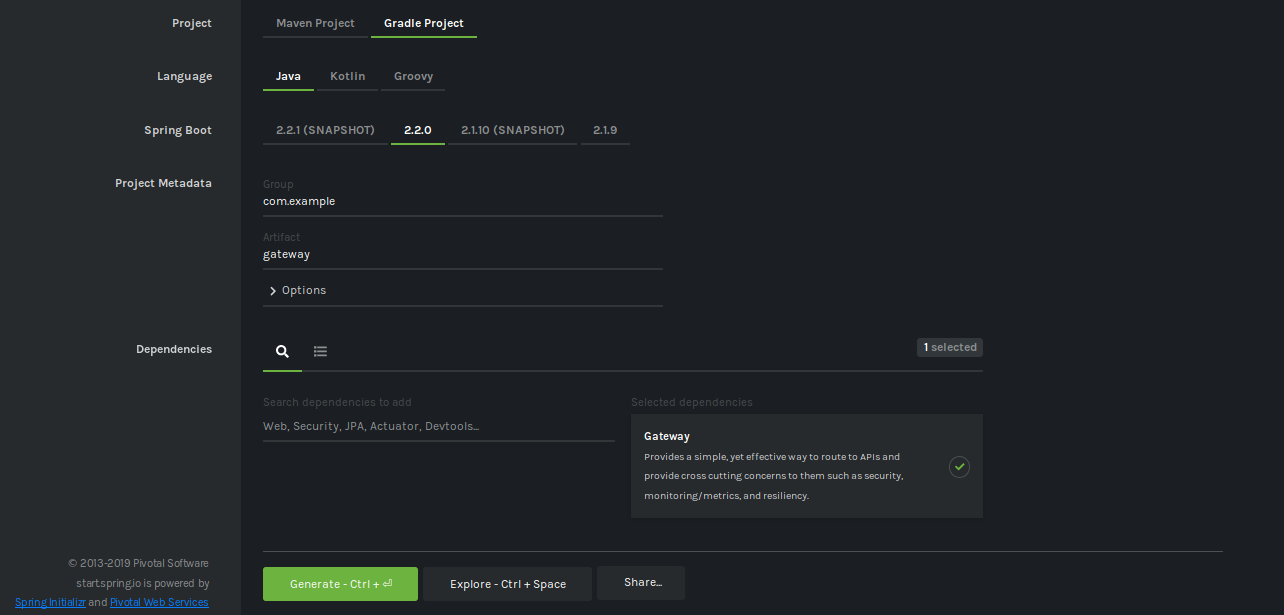
- Create Spring Gateway application
Go to Spring Initalizr, select the gateway as dependencies.
update
springCloudVersionfromHoxton.M3toHoxton.M2, as there is an issue in spring cloud kubernetes release due to which routing will not work correctly.EDIT: 25-Oct-2019 - The issue is fixed in
Hoxton.RC1
Include spring-cloud-starter-kubernetes, spring-cloud-starter-kubernetes-ribbon and spring-boot-starter-actuator.
- spring-cloud-starter-kubernetes provides common interface implementations that consume kubernetes native services.
- spring-cloud-starter-kubernetes-ribbon is client side load-balancing based on Netflix Ribbon for kubernetes services.
- spring-boot-starter-actuator provides additional features to monitor and manage your applications.
After adding all the dependecies, your build.gradle should look something like
EDIT: Spring Cloud Ribbion support is deprecated in Spring Cloud gateway. Instead it will use Sprint Loadbalancer for same. All the examples and github repo are updated for Spring Loadbalancer
That's it, we don't need to add any additional code for gateway to work. Now let's create the configuration file application.yml in src/main/resources as shown below
spring:
  application.name: gateway
  cloud:
    gateway:
      discovery:
        locator:
          enabled: true
          lowerCaseServiceId: true
          # url-expression: "'http://'+serviceId"
    # enable if configuration need to be loaded from ConfigMap or Secrets
    # kubernetes:
    #   reload:
    #     enabled: true
    #     mode: polling
    #     period: 5000
server:
  port: 8080
logging:
  level:
    org.springframework.cloud.gateway: TRACE
    org.springframework.cloud.loadbalancer: TRACE
management:
  endpoints:
    web:
      exposure:
        include: '*'
  endpoint:
    health:
      enabled: true
    info:
      enabled: true
In above file spring.cloud.gateway.discovery.locator.enabled is used to enable dynamic service discovery with the help of etcd which is used by kubernetes to store current state of kubernetes cluster.
It also store the information about service and deployments. remaining configuration such as logging and management are used for logging the information and actuator endpoints respectively.
There are few additional files we need to create for deployment in Kubernetes.
First we need to create an Dockerfile in source directory of gateway application
FROM openjdk:8-jdk-alpine as build
COPY . /app/gateway
WORKDIR /app/gateway
RUN ./gradlew clean build

FROM openjdk:8-jdk-alpine
COPY --from=build /app/gateway/build/libs/gateway-0.0.1-SNAPSHOT.jar /app/gateway.jar
EXPOSE 8080
ENTRYPOINT [ "java", "-jar", "/app/gateway.jar" ]
In the above given docker file, we are using multi-stage docker file, where we first build an standalone JAR and then copy the same in new container. Recommended will be to use an JRE image, which will drastically reduce the size of container.
Now, let's create an docker image using below command from the gateway source directory
docker build --tag=gateway:latest .
push the docker image to the an docker repository. In-case you want to deploy this on minikube, then no need to push the docker image, just execute the eval $(minikube docker-env) in terminal before building docker image.
We need an service account to allow gateway application to read details of service and pods. We can create service-account.yaml****
apiVersion: v1
kind: ServiceAccount
metadata:
  name: gateway
  namespace: default # change with your namespace
Create service account using command kubectl apply -f service-account.yaml
Now, let's create an role applicable within default namespace which provides permission to read services, pods and endpoints. We can use below namespace-role.yaml
apiVersion: rbac.authorization.k8s.io/v1
kind: Role
metadata:
  name: gateway-role
  namespace: default # replace with your namespace
rules:
- apiGroups: [""]
  resources:
  - endpoints
  - namespaces
  - pods
  - services
  verbs:
  - get
  - watch
  - list
Create namespace role using command kubectl apply -f namespace-role.yaml. The above permissions are only limited to default namespace.
Once we have create role and service account, then we need bind role with service account. We can create an role-binding.yaml for the same
apiVersion: rbac.authorization.k8s.io/v1
kind: RoleBinding
metadata:
  name: gateway-read
  namespace: default # This only grants permissions within the "development" namespace.
subjects:
- kind: ServiceAccount
  name: gateway # Name is case sensitive
  namespace: default
roleRef:
  kind: Role
  name: gateway-role
  apiGroup: rbac.authorization.k8s.io
Create Role Binding using command kubectl apply -f gateway/role-binding.yaml. Now, we have assigned all the required permission to get list of services and pods.
Let's create an deployment.yaml, which we will be used to create an managed pods for gateway application.
apiVersion: apps/v1
kind: Deployment
metadata:
  name: gateway-deployment
  labels:
    app: gateway
spec:
  replicas: 1
  selector:
    matchLabels:
      app: gateway
  template:
    metadata:
      labels:
        app: gateway
    spec:
      containers:
      - name: gateway
        image: gateway
        imagePullPolicy: Never #comment except minikube
        ports:
        - containerPort: 8080
        livenessProbe:
          httpGet:
            path: /actutator/health
            port: 8080
          initialDelaySeconds: 30
          periodSeconds: 15
          timeoutSeconds: 10
      serviceAccountName: gateway
The containerPort mentions the port number on which gateway run by default. livenessProbe is used to monitor health of gateway application. The serviceAccountName applies the service account name which is applied to each pod. It allows application gateway to read the name services and pods from etcd using service account permission which were given earlier in the post. If you want to use local container image available in docker environment or minikube docker environment then keep imagePullPolicy to Never.
Create Deployment in kubernetes using kubectl apply -f deployment.yaml.
To access the gateway from outside of the kubernetes, we will need an service. Although, preferable would be to use LoadBalancer service type for production, but for demo purpose we will use NodePort. We can use service.yaml to create service
apiVersion: v1
kind: Service
metadata:
  name: gateway-service
spec:
  selector:
    app: gateway
  type: NodePort
  ports:
    - port: 80
      targetPort: 8080
Here targetPort mentions the port number of container on which application is exposed. Use command kubectl apply -f service.yaml to create service in kubernetes.
There two additional application which we have created for the demo purpose, named booking and tracking. To Deploy these application, execute below set of commands for each application from their source directory. Booking Application
# apply miniube docker image
eval $(minikube docker-env) # comment if not using minikube

docker build --tag=booking:latest .
kubectl apply -f deployment.yaml
kubectl apply -f service.yaml
Tracking Application
# apply miniube docker image
eval $(minikube docker-env) # comment if not using minikube

docker build --tag=tracking:latest .
kubectl apply -f deployment.yaml
kubectl apply -f service.yaml
We won't discuss about the content of deployment and service as they are pretty same as above. The only notable difference is that their is no service type assigned. Default type for kubernetes service type is ClusterIP, which is used by kubernetes to internally load balance request issued to any service from within cluster.
Let's execute command kubectl get svc to get list of all services.

As we can notice, there is service type NodePort with port no 31112 for gateway application. So, we can access the gateway application on the given port using node IP. NodePort IP will be dynamically allocated, so it could be different for you. Since I am executing it on minikube, so for now node IP can be retrieved using command minikube ip. Service type for other application is ClusterIP. Given appropriate permission any service within kubernetes can access another service using ClusterIP.
Let's see if all of our gateway application is up and running with tracking and booking application using kubectl get pods.

Since everything is up and running. Let's call *actuator/gateway/routes,* which gives the list of all services registered in kubernetes.

So we are all setup, now to verify if routing is actually working. Let's send an request to booking application using route /booking-service/hello and below is the result.

Let's send another request to /booking-service/hello and below is the result.
![]()
Congratulations, we are ready with our API Gateway for kubernetes.
The entire source code is available in the repository. In case you are running your application in minikube like me just follow below steps
- start minikube using command
minkube start - download repository and move to the folder spring-cloud-gateway-in-kubernetes
- execute deploy-script.sh, which will build docker images in minikube docker environment.
- Execute clean-up.sh to destroy all configurations, once you want to delete everything.
Please do comment and give your feedback.