Ionic2 - Secure Storage in mobile application
Securing communication between mobile application and back-end server is crucial. We should authenticate the requests sent from mobile applications before serving them. Authentication may require username and password for the user, which most of the developers store into mobile local-storage. Storing sensitive information in local-Storage is a very bad practice, instead you should use other options such as JWT tokens or Social providers. To get more information look to Security for Cordova mobile applications.
An token is also an sensitive information, which we need to store somewhere, so what shall we do? Thank God cordova have such large community support, we will look for one of such plugin which can help us here.
Before using plugin, lets first create the blank ionic2 application
ionic start --v2 SecureStorageExample blanknavigate to the directory of your application and add the secure storage plugin using the below command
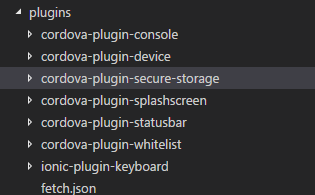
ionic plugin add cordova-plugin-secure-storageonce the plugin get's added, our plugin folder will have one more directory for secure storage as shown

now let's open app.module.ts and import SecureStorage
import { SecureStorage } from 'ionic-native';now add secure storage into providers of module, which will make our code to look something like below
import { NgModule, ErrorHandler } from '@angular/core';
import { IonicApp, IonicModule, IonicErrorHandler } from 'ionic-angular';
import { SecureStorage } from 'ionic-native';
import { MyApp } from './app.component';
import { HomePage } from '../pages/home/home';
@NgModule({
    declarations: [MyApp, HomePage],
    imports: [IonicModule.forRoot(MyApp)],
    bootstrap: [IonicApp],
    entryComponents: [MyApp, HomePage],
    providers: [SecureStorage, { provide: ErrorHandler, useClass: IonicErrorHandler }]
})
export class AppModule { }
now let's see secure storge in action. first we will import SecureStorage in app.component.ts. Change the app.component.ts as shown
import { Component } from '@angular/core';
import { Platform } from 'ionic-angular';
import { StatusBar, Splashscreen } from 'ionic-native';
import { HomePage } from '../pages/home/home';
import { SecureStorage } from 'ionic-native';
@Component({  templateUrl: 'app.html'})
export class MyApp {
    rootPage = HomePage;
    constructor(platform: Platform, secureStorage: SecureStorage) {
        platform.ready().then(() =>{
            // Okay, so the platform is ready and our plugins are available.
            // Here you can do any higher level native things you might need.
            StatusBar.styleDefault();
            Splashscreen.hide();
            //name of our secure storage application, if it's already created then it won't be created
            secureStorage.create('funWithHybrid').then(
                () => {
                    console.log("Secure Storage is ready");
                    },
                (error) => {
                    //there should be screen lock available in your application with pin or pattern
                    console.log(error);
                }
            );
        });
    }
}
Let me explain the above code to you. First we will create a secure storage specific to our application. here we will name it "funWithHybrid". This is a one time activity, the create method within SecureStorgae will create the storage if it's not present, else it won't do anything.
Note: SecureStorage plugin will throw error, if there no lock screen is set with pin/pattern to mobile. Many new developers have reported this as bug, but the cause always seem to be no lock screen.
Now we can set our key anywhere in the example, for demo purpose we will set an key and try to fetch it within one page. Let's set this all in our home.ts, but before that we need to know about two methods:
- set('keyName','KeyValue') : This method will be used to set any key value with two parameters. it takes input in string type.
- get('keyName') : This method is used to get key value from storage. It returns output in string format.
Update home.html and home.ts as shown below
home.html
<ion-header>
  <ion-navbar>
    <ion-title>
      Secure Storage Example
    </ion-title>
  </ion-navbar>
</ion-header>
<ion-content padding>
  <ion-list>
    <ion-list-header>
      Set Key Value
    </ion-list-header>
    <ion-item>
      <ion-label floating>Set Key</ion-label>
      <ion-input type="text" [(ngmodel)]="setValue"></ion-input>
    </ion-item>
    <ion-item>
      <button ion-button (click)="setKey()">Set</button>
    </ion-item>
    <ion-list-header>
      Get Key Value
    </ion-list-header>
    <ion-item>
      <button ion-button (click)="getKey()">Get</button>
    </ion-item>
    <ion-item>
      <p>Get Key value: {{getValue}}</p>
    </ion-item>  cover
  </ion-list>
</ion-content>
home.ts
import { Component } from '@angular/core';
import { NavController } from 'ionic-angular';
import { SecureStorage } from 'ionic-native';
@Component({
  selector: 'page-home',
  templateUrl: 'home.html'})
export class HomePage {
  private getValue: string;
  private setValue: string;
  constructor(public navCtrl: NavController, public secureStorage: SecureStorage) {  }
  private setKey():void {
    //set token/key for your application, although you can set anywhere    console.log('set called');
    console.log(this.secureStorage);
    this.secureStorage.set('mytoken', this.setValue)
    .then(
      data => console.log(data),
      error => console.log(error)
    );
  }

  private getKey():void {
    console.log('get called');
    this.secureStorage.get('mytoken')
    .then(
      data => {
        this.getValue = data;
        },
      error => {
        console.log(error)
        }
      );
    }
  }
Here in setkey(), we will first try to set the value for our key by calling set() method of Secure Storage. In getKey() we try to fetch the same value from secure storage. This marks the end of our simple example. Github link for Example