Ionic2 - Internationalization using ng2-translate
To target target people from different countries, i18n support is required for your mobile app . Here in India where there are so many local languages, i18n support in mobile apps is must.
In This blog, we will look how we can achieve i18n in ionic2 apps.
We all know ionic2 is based on angular version 2. New angular version has it's own internationalization(i18n) approach, but sadly this approach is not yet supported in ionic2.
Ionic team suggests to use ng2-translate for the internationalization in ionic2. Let's begin with it
Create a blank application in ionic2
ionic start --v2 i18Ionic blanknavigate to folder i18Ionic in terminal/cmd and install ng2-translate npm package in your ionic project
npm install ng2-translate --saveOnce the npm package is installed, we are ready to configure our application for i18n support.
in ng2-translate, we need to create json specific to the languages which we want to support in our code. In this example we will support two languages Hindi(hi) and English(en). 'hi' and 'en' are the language code.
create a folder i18n in assets folder of your ionic project, and add two files en.json and hi.json in i18n folder.
en.json
{
  "title":"Change language",
  "welcome":"an example of multi-language support",
  "language":"Language"
}
hi.json
{
  "title":"भाषा बदलो",
  "welcome":"बहु-भाषा समर्थन का उदाहरण",
  "language":"भाषा"
}
now, let's create a provider which will keep the list of languages our application support, you can get this value form server too.
ionic g provider AppLanguagesit will create a file app-languages.ts in a folder named provider. Change your file app-languages.ts to look something as shown
import { Injectable } from '@angular/core';
@Injectable()
export class AppLanguages {
  private languages: String[];
  constructor() {
    this.languages = ['en', 'hi'];
  }

  public getLanguages(): String[] {
    return this.languages;
  }
}
Open app.module.ts and import two HttpModule and TranslateModule
import { HttpModule, Http } from '@angular/http';
import { TranslateModule, TranslateLoader, TranslateStaticLoader } from 'ng2-translate';
import { AppLanguages } from '../providers/app-languages';
put the following code within app.module.ts
export function createTranslateLoader(http: Http) {
  return new TranslateStaticLoader(http, './assets/i18n', '.json');
}
Here we are exporting a function createTranslateLoader, which uses the TranslateStaticLoader service. TranslateStaticLoader is available by default in ng2-translate. it takes 3 parameteres. First is http service from angular package, second is the path of the language files, which we have created earlier and third is the format of the file which stores the language specific translations in key/value pair. in our case it is json file. You can keep language file on server too and can fetch it as required.
Now change @NgModule to look something like this
@NgModule({
  declarations: [
    MyApp,
    HomePage
  ],
  imports: [
    HttpModule,
    TranslateModule.forRoot({
      provide: TranslateLoader,
      useFactory: (createTranslateLoader),
      deps: [Http]
    }),
    IonicModule.forRoot(MyApp)
  ],
  bootstrap: [IonicApp],
  entryComponents: [
    MyApp,
    HomePage
  ],
  providers: [
    { provide: ErrorHandler, useClass: IonicErrorHandler },
    AppLanguages
  ]
})
export class AppModule { }
as you can see we have included TranslateModule and using createTranslateLoader as factory.
Now open app.component.ts and import
import { TranslateService } from 'ng2-translate';
import { AppLanguages } from '../providers/app-languages';
now update your class MyApp to look something like this
export class MyApp {
  rootPage = HomePage;
  constructor(platform: Platform, private translate: TranslateService,
    private appLanguages: AppLanguages) {
    platform.ready().then(() => {
      // Okay, so the platform is ready and our plugins are available.
      // Here you can do any higher level native things you might need.
      StatusBar.styleDefault();
      Splashscreen.hide();
      this.configNG2();
    });
  }

  private configNG2() {
    // this language will be used as a fallback when a translation isn't found in the current language
    this.translate.setDefaultLang("en");
    // Detect current Language
    var userLang = navigator.language.split("-")[0];
    userLang=(this.appLanguages.getLanguages().indexOf(userLang)>-1)?userLang:"en";
    // the lang to use, if the lang is not available, it will use the current loader to get them
    this.translate.use(userLang);
  }
}
TranslateService is the provided by ng2-translate. Here configNG2() is the function, which we have created. In configNG2(), this.translate.setDefaultLang("en") set's the english as default language. navigator.language gives us the current language of the device, which we can use with this.translate.use() to set as the current language of our application on it's own. if the language of the device is not supported by our application, then we can set application language to default i.e "en".
We want to allow our user's to change the application language if they want to. for this let's make some changes in home.ts and home.html
Inject AppLangauge in the home.ts and change our home.ts
import { Component } from '@angular/core';
import { TranslateService } from "ng2-translate";
import { NavController } from 'ionic-angular';
import { AppLanguages } from '../../providers/app-languages';

@Component({
  selector: 'page-home',
  templateUrl: 'home.html'
})
export class HomePage {
  private languages: Array<string>;
  constructor(public navCtrl: NavController, public translate: TranslateService
  , public appLanguages: AppLanguages) {
    this.languages = appLanguages.getLanguages();
  }
}
now configure home.html in your application as shown
<ion-header>
  <ion-navbar>
    <ion-title>
      {{ 'title' | translate}}
    </ion-title>
  </ion-navbar>
</ion-header>
<ion-content padding>
 <ion-list>
    <ion-item>
      <p>{{'welcome' | translate}}</p>
    </ion-item>
    <ion-item>
      <ion-label>{{'language' | translate}}</ion-label>
      <ion-select [(ngmodel)]="currentLang" (ionchange)="translate.use(currentLang)">
        <ion-option *ngfor="let language of languages" [value]="language" [selected]="language === translate.currentLang">{{ language }}</ion-option>
      </ion-select>
    </ion-item>
  </ion-list>
</ion-content>
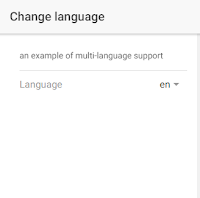
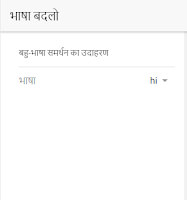
translate is the inbuilt pipe provided by ng2-translate for translation. Here title, welcome and language are the keys and value for them will be updated based on the language file. Build your application or run it on browser using ionic cli. The Output will look something as shown:


That's it our app is now supporting i18n feature, we can add as many as languages to our application, which we want to support.